
| Archive Blog Cast Forum RSS Books! Poll Results About Search Fan Art Podcast More Stuff Random |
|
Classic comic reruns every day
|
1 {photo of a woman taking a photo}
1 Caption: Digital cameras
|
First (1) | Previous (3358) | Next (3360) || Latest Rerun (2876) |
Latest New (5380) First 5 | Previous 5 | Next 5 | Latest 5 Annotations theme: First | Previous | Next | Latest || First 5 | Previous 5 | Next 5 | Latest 5 This strip's permanent URL: http://www.irregularwebcomic.net/3359.html
Annotations off: turn on
Annotations on: turn off
|
A camera is a device which records an image, allowing the scene which the camera "sees" to be reproduced for later viewing. The name comes from the Latin camera obscura, meaning "dark room", and a camera obscura still signifies in modern English the same thing that the term was coined to describe.
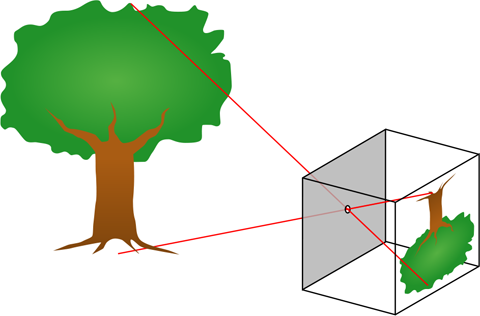
A camera obscura is an enclosed room with no openings or windows for light to enter, apart from a small hole, perhaps just a few millimetres across. Light can enter the hole and illuminate the opposite wall of the room. But light travels in straight lines. Imagine standing with your back to the wall opposite the hole, looking out through the hole. If you stand in a certain position, you will see a small patch of the tree outside. Shift left or right, and your view shifts to see the sky behind the tree. Shift up, and now you can see the ground, since you're looking downwards at an angle through the hole. Squat down, and your gaze shifts upwards through the hole to the sky.
If you imagine facing the hole and scanning your head across the entire area of the back wall, you will be able to see tiny patches of the scene outside through the hole, which build up the entire scene outside.
 Camera obscura diagram. Public domain image, by Bob Mellish and Pbroks13, from Wikimedia Commons. |
So if you take your head away, that light from the scene outside ends up projected on the back wall, with the ground at the top and the sky at the bottom. If you stand back and look at the back wall, you can see an image of the scenery outside, projected upside down. This only works if the hole is tiny enough that each patch of the wall only receives light from a small part of the scene outside, otherwise all the light just gets mixed up and illuminates the wall roughly evenly, as it does from a large window. With a suitably small hole, the image formed by a camera obscura is quite dim.
You can make the image brighter by making the hole larger, to let more light in, and inserting a lens, to focus the rays of light so that all the light passing through the hole from one part of the scene ends up in the same point on the wall, rather than spread out all over. All of this is just background, which I've mentioned in more or less detail before, because today I want to talk about how cameras work. (I've discussed cameras obscura and cameras before, but today I'm going in a different direction. You may like to refresh yourself with that previous article.)
The basic idea of a camera is to build a camera obscura small enough that it can be carried around, to form images of places other than where a large room might happen to have been built. A camera then, is essentially an empty box with a lens on the front to focus the light into an image on the back wall of the box. Once the image is formed there, you need to record it somehow so that you can view it later and perhaps make copies of it to display somehow.
 An old camera. |
One way to record such images is to trace them with drawing tools. If you make the back wall of the box a sheet of translucent paper, and you stick your head under a hood to keep out extraneous light, you can see the scene projected onto the paper and draw or paint it just by tracing it. In this way, a person with limited artistic skill can make a a reasonably faithful image of a real scene.
Another way to record the image is to place a sheet of material containing light sensitive chemicals at the back of the box. Suitable chemicals change their chemical structure when exposed to light. The image projected onto the chemical sheet then causes these changes in a pattern which mimics the scene being projected. This might be enough in itself to produce a picture on the sheet, or the sheet might need additional chemical treatment to "develop" the picture into an image which can be seen. Originally the sheet was glass and the available chemicals reacted only to the intensity of light, producing a black and white image. Later inventions changed the glass to a more robust polymer film, and added sensitivity to different colours, giving us colour film photography.
There is a lot more that can be said about the chemistry of film photography, but I'm going to skip over that to get to the heart of today's topic, which is how newfangled digital cameras work. A digital camera basically replaces the sheet of film or glass with an electronic light sensor.
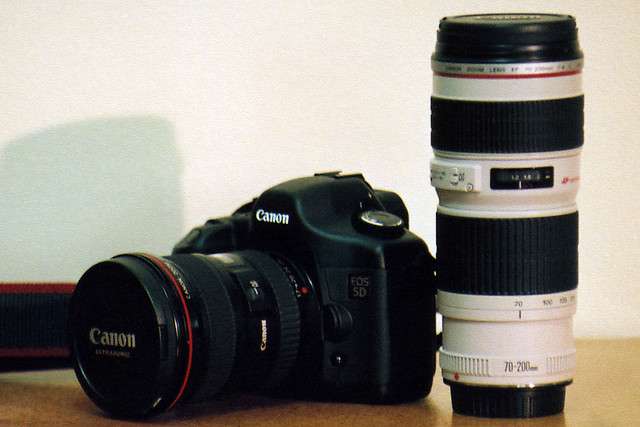 My first digital SLR camera. This is the very last photo I took with my last film camera. |
The electronic sensor in a camera basically works on the same principle as a solar cell: when it is exposed to light, it generates an electric current, in a process called the photovoltaic effect. At a slightly more detailed level, when a photon of light hits the silicon layers of a solar cell, it excites a bound electron within the silicon, freeing it to move through the crystal structure. The electrons thus released can flow through the silicon, be collected by a wire, and then flow out to form an electric current, which returns the electrons back to the mass of silicon via another wire. The more light, the more electrons are excited, and the greater the electric current produced.
For the purposes of forming an image, you need to chop your solar cell up into tiny pieces, and let each piece react to the light intensity separately, generating electrons in proportion to the light intensity at a tiny portion of the whole image. This is the same principle used in electronic display screens. To display a picture you use an array of tiny picture elements (or pixels), each with a brightness and colour representing the small patch of the total image at its location. Similarly, a camera sensor is divided into a rectangular grid of pixels, each one detecting the light level of a tiny part of the scene, so it can be recorded separately from other parts of the scene.
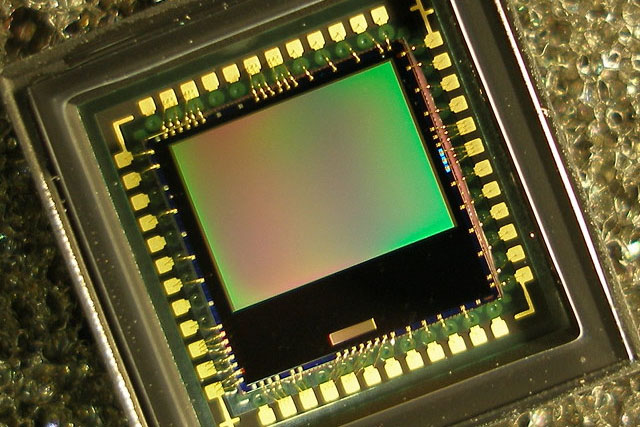 Digital camera sensor. Creative Commons Attribution-Share Alike image, by Filya1, from Wikimedia Commons. |
The electrons generated by a sensor pixel are not drawn off immediately to form an electric current. Instead, they are stored in an electrical trap known as a potential well, each pixel's electrons stored in a separate tiny well on the silicon chip. The number of electrons accumulated in a well depends on the number of photons which strike its associated pixel during the exposure time of the camera as it takes a photo. The brighter the light from the scene, projected onto a given pixel, the more electrons that pixel generates.
After the exposure is completed, circuitry reads out the number of electrons trapped in each potential well, across all of the pixels of the sensor. They are read off as numbers, and those numbers can then be stored in a digital file format and saved to electronic memory. Typically a modern digital camera saves the file to a removable memory card. The file can be transferred to a computer by plugging in either the memory card, or the camera with the memory card inside it. And the computer can read the file, interpret it correctly as an image, and display it on your screen or print it out.
That's the basic workflow, but there are a few interesting features along the way. The silicon of a typical camera sensor is sensitive to pretty much all visible light. It is also highly sensitive to near infrared light - infrared wavelengths just beyond the visible spectrum. Since we can't see this infrared light, we don't want to record it as part of our photos (usually). If infrared light hits the sensor, it will produce electrons just like visible light does, making things which emit infrared light look much brighter than they do to our eyes. Living things, including vegetation, emit lots of infrared, and so people and animals and trees would all end up looking like they are glowing. To prevent this, a filter is placed in front of the sensor, to filter out infrared light and prevent it from hitting the sensor.
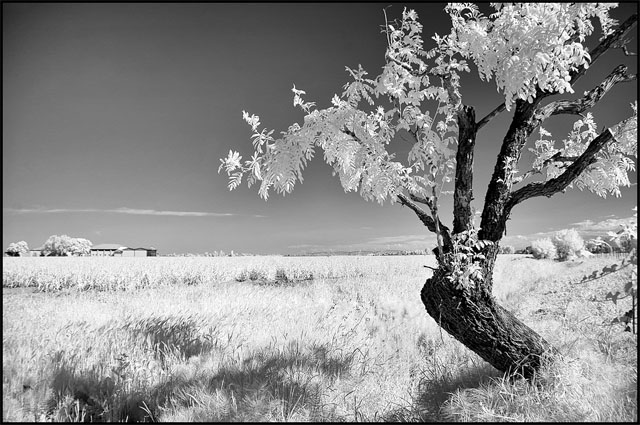 An infrared photo, taken by removing the infrared filter from a digital camera. The grass and tree foliage are very bright in infrared. Creative Commons Attribution-NonCommercial-Share Alike image, by Sergio Bertolini. |
The next complication involves colour. The silicon sensor is sensitive to all wavelengths of light, in a similar way to black and white film. If any colour of light hits a pixel, it will generate electrons. The result is a simple light intensity image, which is basically a black and white image. To record colour information that can be used to recreate a colour image of the scene, we need to record the light in the same way that our eyes sense light.
Recall from a previous discussion that our eyes sense colour because we have different types of light sensitive cells in the retinas at the back of our eyeballs. The cone cells, in particular, come in three different types, which we can call red, green, and blue. Each type of cone cell is sensitive primarily to light of the indicated colour. If red light enters the eye, it stimulates the red cone cells much more than the green or blue ones, and our brain interprets that stimulus as "red". Similarly for green and blue. So what we need in our digital camera is for some of the pixels to be sensitive to red light, some to green light, and some to blue light. If this is the case, then the electronic processing of the image can deduce that a certain area of an image is red - because it has been detected with the red-sensitive pixels, but not with the green or blue-sensitive ones - and show it appropriately as red on a display screen or a printed copy of the photo.
To achieve this, the uniform pixels sensitive to all light are modified by placing coloured filters in front of them. To get a pixel sensitive to red, but not green or blue, you stick a red filter in front of it, like a bit of red cellophane, which lets red light pass through, but blocks green and blue light. Similarly, to produce green-sensitive pixels you put a green filter in front of them, and to produce blue pixels you put a blue filter in front of them.
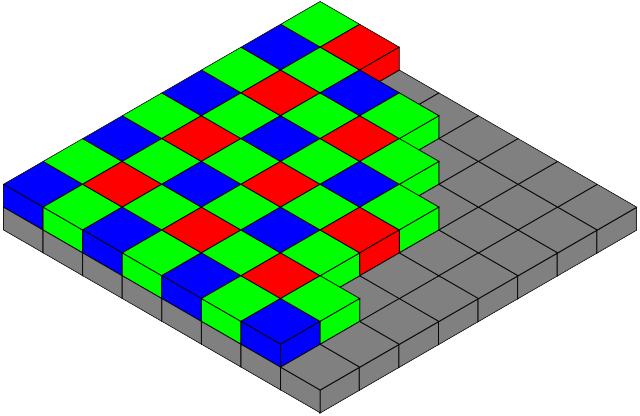 Bayer filter arrangement of coloured filters on a digital camera sensor. Creative Commons Attribution-Share Alike image, by Colin M.L. Burnett, from Wikimedia Commons. |
To match other colours that we perceive, we need to design these filters carefully. If yellow light shines in our eyes, it stimulates both the red and green cone cells, but not the blue ones, and our brain interprets this particular stimulus as the colour yellow. To record yellow properly on our camera, we have to make sure the red and the green filters both also let some yellow light pass through. Then areas of the image where both green-filtered pixels and red-filtered pixels register light can be rendered correctly as yellow on our displays or prints. If, for example, the green filter didn't let through enough yellow light, then things which are yellow in reality would appear too red in our photo. In fact, to get good colour reproduction, the filters over the pixels on the camera sensor should ideally be a close match to the sensitivities of human cone cells. They don't have to be exactly matched to human cone cells, because we can partially correct for some of the colour discrepancies in software, but it's easier and more accurate if the match is close.
The next complication is that if you stick a red filter over a pixel, you can no longer use that pixel for detecting blue or green light, and vice versa and so on. So instead of all the pixels on your sensor being sensitive to all light (giving you a black and white image), some fraction of them are sensitive to red, another fraction to green, and the rest to blue. To produce an even coverage of colour sensitivity across the image, you want to spread the different filters evenly across the sensor. In practice this is usually done by arranging the colour filters in a regular pattern, so that in each square block of four adjacent pixels two of the diagonally opposite pixels are green-filtered, one of the others is red, and the last one is blue. This pattern is then repeated like a tiling across the entire sensor. This arrangement is known as a Bayer pattern, and the entire collection of individual pixel colour filters is known as a Bayer filter, after Bryce Bayer, who invented it while working for Kodak.
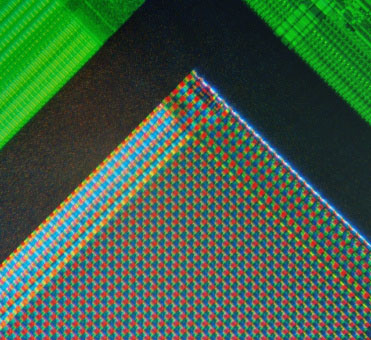 Micrograph photo of a digital camera sensor, showing the Bayer filter array. Creative Commons Attribution-Share Alike image, by Natural Philo, from Wikimedia Commons. |
Why are there twice as many green pixels as red or blue pixels? This is because the human eye is most sensitive to fine details which appear in green light than in red or blue light. So again, to mimic the eye and provide roughly the same level of data needed to reproduce an image for human vision, it makes sense to record twice as much data in green than in either red or blue. The Bayer pattern is not the only possible layout of colour filters on a digital camera sensor, but it is the most widely used because of its good match to the human visual system. Some camera companies have experimented with different layouts or even different filter colours, such as sprinkling some unfiltered pixels around to improve light sensitivity, but this comes with the trade-off cost of poorer colour sensitivity (which may be a good trade for some technical applications, but generally not for photography intended to capture scenes in realistic colours).[1]
So, when a typical Bayer filter digital camera takes a photo, what does the resulting image look like? The raw image data off the sensor may surprise you. If you take a photo of a green object, then the green-filtered pixels will register bright light, while the red and blue ones register dim light. Remember each individual pixel can only register a light level, not full colour information. When the resulting image is displayed on a screen, all you can show is an illumination level, not full colour information. The green pixels in the Bayer pattern look bright, and the red and blue pixels look dim. Because the green pixels are arranged in a checkerboard pattern across the sensor, the resulting photo of a green object looks like a checkerboard of bright and dark pixels. Similarly, if you take a photo of a red object, the red Bayer pixels look bright, and the blue and green ones dark, so the pattern is checkerboard-like, with only one in every four pixels appearing bright. And similarly again for a blue object. A Bayer pattern photo of a full colour scene looks like a varying checkerboard mosaic of tiny pixel tiles, which keep alternating in brightness.
To render the photo data as a full colour image, you need to have three pieces of data at every single pixel: a red, a green, and a blue level. Not just the single illumination level of whatever colour that pixel is filtered to detect. So how is this done? Well, a green-filtered pixel only carries green data, but the pixels immediately above and below it on the sensor are red-filtered, so they have red data. The red data they recorded is not the true red level of the scene at the precise location of the green pixel, but it's almost certainly going to be pretty close. So you can estimate the red level at the green pixel by averaging the red levels of the two red pixels next to it. Similarly, the same green pixel will have blue-filtered pixels immediately to the left and right, and averaging those gives you an estimate of the blue level of the scene at the green pixel. So now we have green, red, and blue data at the original green pixel, and we can display those together to represent the actual full colour of that pixel.
We can apply the same process to all the green pixels across the sensor (except for the ones on the very edge, but we can make slightly different estimates there). And similarly for the red and blue filtered pixels, we can estimate the [green and blue] and [green and red] levels at each of those, respectively, by averaging the nearest appropriate pixels.
This process of turning the original raw camera data which looks like a mosaic into a full colour image is called demosaicing. When a camera takes a picture and saves it as a full colour image file (usually in JPEG format), the electronics inside the camera are performing this demosaicing before saving the file. Some cameras, mostly digital SLRs, can be configured to instead save the raw sensor data. If you could look at this raw data, it would look like a black and white checkerboard mosaic, but most preview software automatically does a quick demosaicing before displaying it for you. To work on the full colour image in a program such as Photoshop, you need to first convert the raw data to colour by demosaicing it.
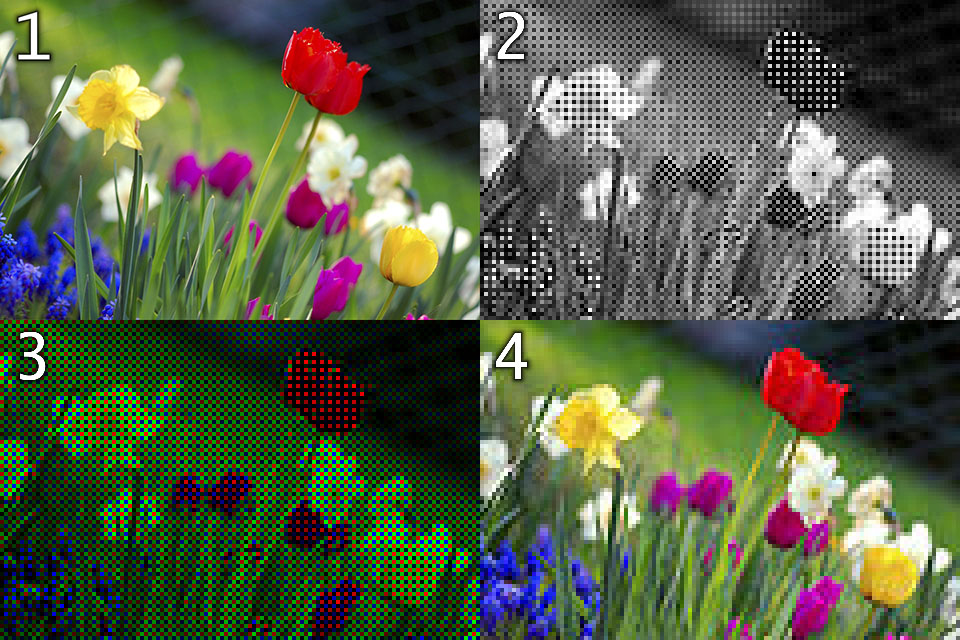 Example real world scene (1); light intensities as recorded on a Bayer filter sensor (2); same light intensities colour coded according to the Bayer filter colour of each pixel (3); reconstructed colour image after demosaicing (4). Modified from Creative Commons Attribution-Share Alike image, by Anita Martinz and Cmglee, from Wikimedia Commons. |
What is the advantage of saving the raw data, rather than a demosaiced colour image? One advantage is that you can reprocess the file using a different demosaicing algorithm. Simply averaging the nearest red pixels to determine the red level of a green Bayer pixel is not actually the best approach. You might also want to take into account how fast the red level is changing, and in which direction, in that region of the image, which you can do by examining some more red pixels a bit further away. And the interpolation of the red level at a green pixel can use various different mathematical operations, which all give slightly different results. So there is not one demosaicing algorithm to rule them all - you can try different ones and see which one gives you a better looking colour image.
Another advantage of saving the raw data is that JPEG files are highly compressed to take up less memory space, which results in a loss of some image quality. It's often barely perceptible, but if you want the best image quality, you should start your processing chain with a raw image. Yet another advantage is that raw files store the image brightness samples using a larger number of bits per pixel than a JPEG. A JPEG image uses 8 bits per pixel for each colour, giving 256 possible levels of brightness for each of red, green, and blue (which means 2563 = 16,777,216 possible different colours). This is okay, but a typical camera raw image file uses 14 bits for each pixel, meaning it can store up to 16,384 different levels of brightness (giving 4,398,046,511,104 different colours). This means you can distinguish between areas of slightly different brightness that would be mapped into exactly the same colour in a JPEG image. You can see the difference on a high quality print, or a high dynamic range monitor, which will become more common as time goes by. It also means you can reprocess your photos to bring out different details, such as shadow or highlight details which might otherwise be rendered in a JPEG as either uniform black or white, respectively. So to future-proof your photos, or provide for reprocessing them in different ways and getting the best quality results, save the raw data files, not just JPEGs. (The disadvantage is that raw photo files are much bigger than JPEGs in file size, so you need more disk space to save them.)
Although the Bayer pattern does a good job of capturing the colour information that you need to reconstruct a colour image for human vision, it has a problem. For a green object in the scene to be captured and recorded, it has to have rays of light hit some of the green-filtered pixels on the sensor. Imagine you have a very tiny green object, like a spot of green light from a distant Christmas tree, which goes through the camera lens and falls on just one pixel of the sensor. If that pixel is green, fine, the light will be recorded. But if that pixel happens to be red, then the green light will be filtered out and the pixel will see darkness. The green light in the scene won't appear in the image! Now imagine the light is actually white. White light is a mixture of all colours, so it will get through both the green and the red filters to be detected. But if it hits only a green pixel it will be recorded as a spot of green light, and if it hits only a red pixel, it will be recorded as a spot of red light. And you can't interpolate the correct colour from the surrounding pixels by demosaicing because the light never hits any of the surrounding pixels.
This effect is known as colour aliasing, and it appears not just for tiny spots of light, but also around any sharp edges in your scene, where a bright object suddenly becomes dark or a colour suddenly changes, like at the edge of an object or a pattern. If you took a photo with the Bayer sensor as described so far and demosaiced it, you would see fringes of colour around any edges in the scene. Such artefacts in an image are quite obvious to the human visual system, and make the image look awful and unnatural.
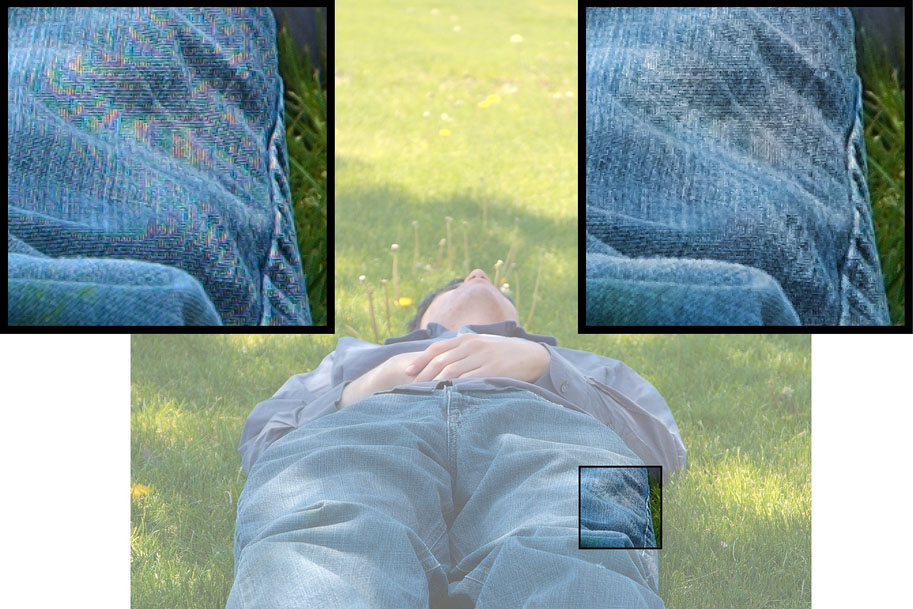 Example of colour aliasing, visible in enlargement at top left, and fixed in enlargement at top right. Modified from Creative Commons Attribution-Share Alike image, by Flickr user theilr. |
To fix this, what you want is for a bright point of light to hit enough pixels on the sensor that it is recorded across pixels of each colour, not just a single pixel of a single colour. You want your point light sources, your sharp edges, and in fact everything to be smeared out across at least two pixels in each direction, so that its true colour can be recorded. In other words, you want to blur the image slightly, by an amount roughly equal to the size of two pixels. Because if you don't the colours will simply be wrong.
To do this blurring, there is another filter layer on top of the sensor, usually sandwiched between the infrared blocking filter and the Bayer filter. This filter blurs the image very slightly, to make sure each incoming ray of light is spread across a complete 2×2 pixel Bayer cell, so the colour can be sampled correctly. This filter is known as either an anti-aliasing filter, or a low-pass filter (because it stops sharp details, or high spatial frequencies in optics jargon, from getting through to the sensor, and allows low spatial frequencies to pass through).
If you do some searching for "anti-aliasing filter" or "low-pass filter" in discussions about cameras, you might find some people complaining that camera manufacturers put this "blurring" filter on all their camera sensors. Making your image deliberately blurrier sounds like a bad thing to do, and lots of camera enthusiasts want only the sharpest possible images from their gear. But not having the low-pass filter would be a mistake, because the trade off you make for sharper photos is inaccurate colour artefacts all over your image, which most people would consider visually unacceptable.
There's plenty more to say about digital cameras, but I'm out of time this week. I hope this has given you a greater appreciation for the complexity and amazingness of those gadgets we use so often today.
Yet another system involves splitting the light into three separate beams of different colours, using a cunning arrangement of optical reflection surfaces. You end up with a red beam, green beam, and blue beam, and aim them at three separate image sensor chips, each one of which records one of the colours at full pixel resolution.
The advantage of both these system is that you don't need to demosaic the image - you automatically have red, green, and blue counts for every pixel. The disadvantages are that these systems are significantly more difficult to produce and cost more, and that the colour separation doesn't match the sensitivity profiles of human cone cells, so it's more difficult to achieve faithful colour reproduction.
|
LEGO® is a registered trademark of the LEGO Group of companies,
which does not sponsor, authorise, or endorse this site. This material is presented in accordance with the LEGO® Fair Play Guidelines. |
